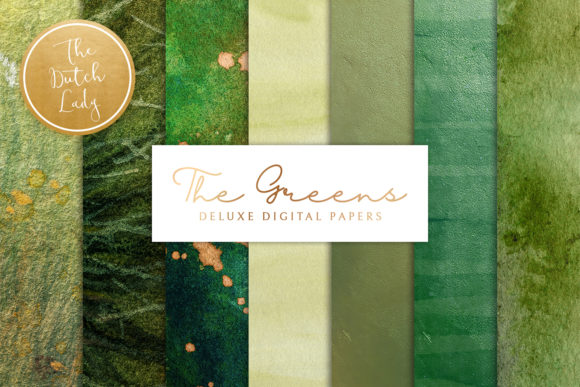
Digital Backgrounds: The Greens Textures
If you’re searching for a versatile set of high-resolution digital papers that bring a fresh, organic feel to your projects, Digital Backgrounds the Greens Textures offers exactly that. This collection includes seven distinct image files, each carefully crafted to provide a rich green palette with natural texture variations. The files are delivered as JPEG images at 300 dpi, with dimensions of 3600×3600 pixels—exactly 12×12 inches. That level of detail means you can use them for large prints, website backgrounds, or detailed digital compositions without worrying about pixelation. The textures are not seamless, but they work beautifully as standalone backgrounds, full-page inserts, or layered elements inside your design software.
These digital papers open up a wide range of creative opportunities. Whether you’re a graphic designer who needs quick, nature-inspired backdrops or a DIY crafter making handmade cards, the set saves you time while delivering professional-grade quality. Small business owners, bloggers, educators, and hobbyists alike can benefit from having a consistent, earthy green palette at their fingertips. Because the textures are not repetitive by design, each one feels organic and unique—perfect when you want a natural look rather than a flat, tiled pattern.
What Makes This Set Useful for Creators
High-resolution digital papers are a staple for anyone who works with visual content, and these green textures stand out for their rich detail and warm tonal range. At 300 dpi and a 12×12 inch canvas, you can print them with confidence for projects like scrapbook pages, party decorations, or product packaging. The JPEG format is universally compatible, so you won’t run into software issues when importing them into tools like Photoshop, Canva, Procreate, or even Lightroom. Plus, with seven different files, you have variety without being overwhelmed—each texture brings its own character, from soft leaf-like gradients to more pronounced textured patterns.
One important practical note: editing these digital papers requires image editing software. Make sure you have a program you’re comfortable with, such as Adobe Photoshop, Affinity Photo, GIMP, or Pixelmator, and that you know how to adjust layers, change opacity, or crop sections. The files are non-seamless, so if you plan to tile them across larger areas, you may need to mirror the edges or use a clipping mask to hide the seams. For most projects, though, a single sheet covering the entire canvas works perfectly.
Practical Projects for Different Creators
- For card makers and paper crafters: Print these textures on matte or gloss photo paper and use them as card fronts, matting layers, or folded card bases. The 12×12 size is ideal for standard card bases, and you can trim them to fit smaller card blanks. Use them as quick backgrounds for stamped images or as color-themed layers for wedding, birthday, or thank-you cards.
- For bloggers and social media managers: Use the green textures as website backgrounds, blog post header images, or Instagram story backgrounds. Their organic look pairs well with natural themes, wellness brands, eco-friendly products, or botanical content. Upload directly to your site or app—just reduce file size if needed, but keep the texture crisp by starting with the high-res original.
- For small business owners and product designers: Print these textures on fabric, mugs, or t-shirts via print-on-demand services like Printful or Society6. The 300 dpi resolution ensures the texture stays sharp on physical products. Test a few variations to see which green tone best complements your logos or product photos.
- For educators and online course creators: Use these digital papers as background slides for presentations, lesson materials, or printable classroom resources. The calm green palette can reduce visual stress while keeping content organized. For digital worksheets, layer a light green texture behind text boxes or borders.
- For hobbyists and digital artists: Incorporate the textures into photo manipulations, digital collages, or composite images. Use them as base layers for painting over, or as texture overlays to add depth to flat graphics. Since they’re not seamless, you can rotate, scale, or crop them to fit unusual frame sizes.
Where Texture Meets Functionality
One common question is how to handle the fact that these patterns are not seamless. For many use cases, seamless tiling isn’t necessary. A single 12×12 inch file is large enough to cover a standard scrapbook page, a 9×12 poster, or a digital canvas of similar proportions. If your design space is larger, simply use one texture as a focal backdrop and let it bleed off the edges—this works well for social media images, slide backgrounds, or product mockups. If you truly need a broader seamless area, you can edit the file in your software by cloning the edges or using a pattern stamp tool. But for most creative work, the organic black edges actually create a framing effect that many designers find appealing.
The high resolution also makes these textures suitable for commercial print projects. At 300 dpi, a 12×12 inch file is print-ready for many common sizes. You can enlarge it slightly (up to 150% with minimal quality loss) if you need a larger poster or banner, but keep in mind that extreme stretching will soften the texture. For best results, always test a small print on your intended paper stock before running a full batch.
Getting the Best Results with Editing Software
Working with digital papers requires a basic understanding of your editing environment. Open the JPEG file in your chosen software, then consider these simple adjustments:
- Brightness and contrast – Green textures can appear darker or lighter depending on your monitor calibration. Adjust the levels or curves to match your project’s mood. A lighter tint works well for a soft, airy background; a deeper green adds drama to printed material.
- Layer modes – Place the texture on a separate layer behind your main content. Use blending modes like Multiply, Overlay, or Soft Light to let the texture interact with other colors. This is especially useful for overlaying text, illustrations, or white borders.
- Crop and resize – Since the originals are 3600×3600 pixels, you can crop a smaller section to isolate a specific texture detail. For websites, export a compressed JPEG (like 1200 pixels wide) to keep load times fast while preserving the look.
- Combining multiple textures – With seven different greens, you can experiment by placing one texture on top of another and using masks or opacity changes. This creates a more complex surface that mimics natural materials like linen, leaves, or dappled light.
Always work on a copy of the file to preserve the original. Label your layers and keep your design system organized—especially when using the same texture across multiple pieces for branding consistency.
Incorporating Greens Textures into Your Brand
For entrepreneurs and freelancers, having a consistent set of backgrounds helps build visual identity. Choose one or two of the green textures as brand backgrounds for your website, social media posts, and email headers. The natural green communicates growth, sustainability, and calm—an excellent choice for wellness coaches, plant shops, eco-brands, or freelance designers who want a professional organic look. When you use the same texture across platforms, your audience will begin to associate that shade and pattern with your business.
If your brand already has colors, layering a green texture behind logo marks or typography can add depth without overwhelming your visual message. Because the textures are not seamless, they have a handmade feel that stands out against flat digital designs. For an easy start, try using one green texture as a consistent background for all your Twitter or LinkedIn header images.
Beyond the Basics: Layering and Combining
Once you’re comfortable with the standard uses, explore more advanced techniques. Use these green textures as masks themselves—invert them and apply to photos for a textured blend. Combine with black-and-white imagery to create vintage or nature-inspired compositions. Create a series of Instagram post backgrounds by pairing different greens with neutral overlays, thin lines, or transparent shapes. The non-seamless edges can become an intentional design element: frame your content with the natural borders of the paper image, leaving a small offset for a polaroid effect.
For print-on-demand entrepreneurs, test how the textures look on different products. A same-sized texture on a notebook cover can be simply placed, while a t-shirt design might require scaling and cropping to fit the print area. The 300 dpi file ensures that even small text overlays remain crisp against the textured background.
Educators can use these digital papers for interactive whiteboard backgrounds during remote lessons. Set the texture as a light backdrop behind your teaching slides—the green reduces eye strain and adds a calming atmosphere. For printable classroom materials, print on eco-friendly paper to match the natural theme.
Finally, consider using these textures as a creative prompt. Try merging two different green papers in a collage, or use them as base layers to paint digitially with brushes. The high-resolution details give you room to zoom in and see the subtle marks, which can inspire new pattern designs or illustrate natural concepts like leaves, moss, or forest floors.
Digital Backgrounds the Greens Textures are more than just a set of seven files—they are a flexible resource that adapts to your creative process. Whether you are printing physical goods, building a brand, or simply adding texture to a digital scrapbook, these greens provide a consistent, earthy foundation. Take the time to experiment with adjustment layers, blending modes, and mixed media ideas, and you’ll find yourself returning to these papers again and again.